
A family upgrades its aging furnace before winter and feels confident about home safety because a carbon monoxide detector installation is mounted in the hallway. A few months later, a technician performing routine maintenance points out a problem. The detector sits directly beside a supply air vent, an installation mistake that can affect how quickly dangerous gas levels are detected.
Situations like this happen more often than many homeowners realize. Carbon monoxide is colorless, odorless, and impossible to detect without specialized equipment. Unlike a water leak or electrical problem, there are often no obvious warning signs until symptoms begin.
The challenge is that many people assume buying a detector is enough. In reality, proper carbon monoxide detector installation is just as important as owning the device itself. A poorly placed detector may not provide the protection homeowners expect during an emergency.
This guide explains where detectors should be installed, the mistakes that reduce effectiveness, how building recommendations work, and the practical steps that help maximize protection throughout the home.
Why Carbon Monoxide Detectors Matter

Many home safety products are designed to reduce risk. Carbon monoxide detectors are different because they are often the only warning system available before exposure becomes dangerous.
What Carbon Monoxide Actually Does to the Body
Carbon monoxide enters the bloodstream through the lungs and attaches to hemoglobin much more readily than oxygen. As a result, the body receives less oxygen even when breathing normally.
Early symptoms often include:
- Headaches
- Dizziness
- Fatigue
- Nausea
- Confusion
Because these symptoms resemble common illnesses, many people do not immediately recognize carbon monoxide exposure.
As concentrations increase, the risks become far more serious. Victims may experience loss of coordination, unconsciousness, permanent neurological damage, or death.
One reason carbon monoxide incidents are particularly dangerous is that exposure often occurs during sleep. Occupants may never notice symptoms developing.
Real-World Carbon Monoxide Statistics
According to data from the U.S. Centers for Disease Control and Prevention (CDC), hundreds of people die each year from unintentional non-fire-related carbon monoxide poisoning, while tens of thousands visit emergency departments for treatment.
Several common household sources contribute to incidents:
- Gas furnaces
- Water heaters
- Fireplaces
- Portable generators
- Gas ranges
- Vehicle exhaust from attached garages
Many cases are preventable through proper maintenance and correct detector placement.
Carbon Monoxide Detector Installation Requirements

Many homeowners search online for a single installation rule. However, recommendations vary slightly depending on local building codes, home layout, and detector type.
National Recommendations
Safety organizations recommend installing detectors:
- Outside sleeping areas
- On every level of the home
- Near bedrooms
- In homes with fuel-burning appliances
- In homes with attached garages
For example, a two-story house with three bedrooms should generally have multiple detectors rather than a single unit placed in a central hallway.
Proper carbon monoxide detector installation focuses on coverage rather than simply meeting a minimum requirement.
Local Building Codes May Differ
Building codes can vary between municipalities and states.
Some jurisdictions require:
- Hardwired interconnected detectors
- Combination smoke and carbon monoxide alarms
- Specific installation locations
- Additional protection in newly constructed homes
Because of these differences, homeowners should always verify local requirements before installation.
Even when code compliance is achieved, additional detectors may improve protection in larger homes.
Battery vs Hardwired Detectors
Both detector types can provide effective protection, but each offers unique advantages.
| Feature | Battery-Powered | Hardwired |
| Installation Difficulty | Easy | Moderate |
| Upfront Cost | Lower | Higher |
| Power Reliability | Depends on battery | Continuous power |
| Backup Protection | Battery only | Usually battery backup |
| Best For | Existing homes | New construction |
Battery-powered models are often easier for DIY homeowners. Hardwired systems provide consistent power and can integrate with interconnected alarms.
Choosing the right option is an important part of carbon monoxide detector installation, especially in larger homes.
Installation Mistakes Homeowners Make Most Often

Many installation failures occur not because the detector is defective, but because placement decisions reduce effectiveness.
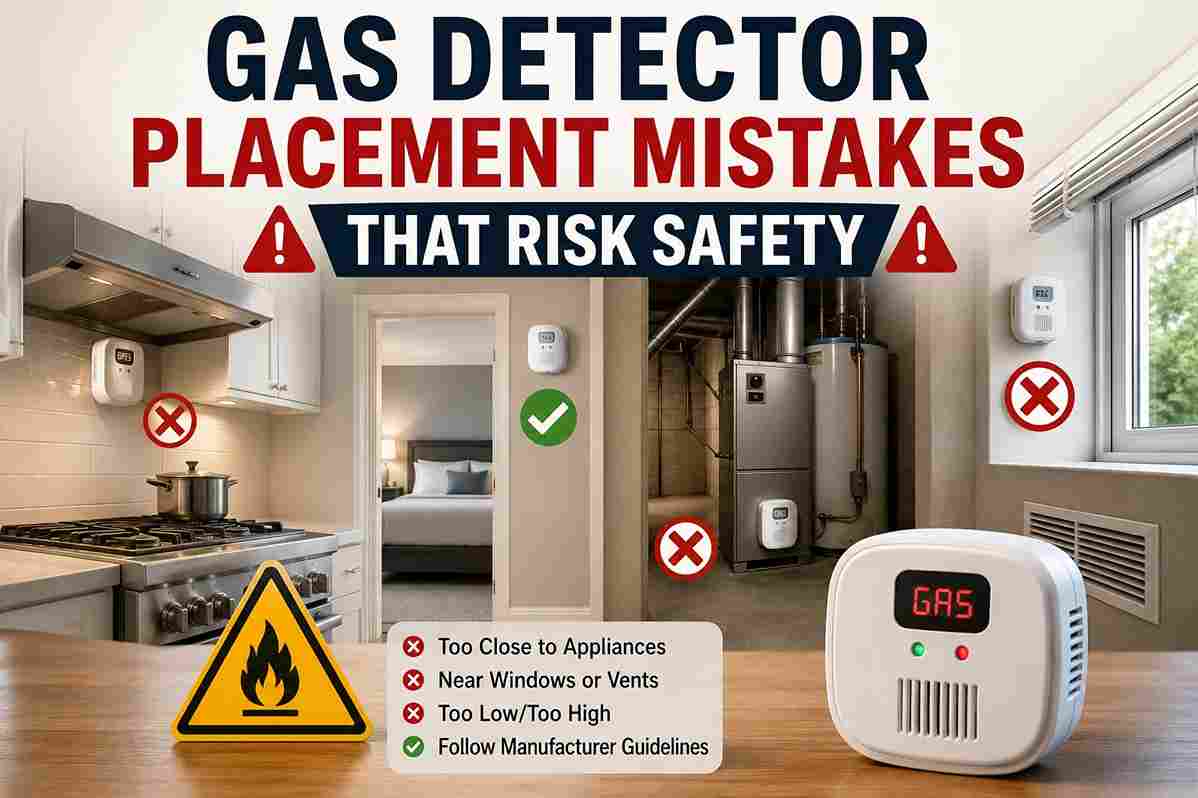
Installing Too Close to Fuel-Burning Appliances
A common mistake involves placing detectors directly beside:
- Furnaces
- Water heaters
- Boilers
- Fireplaces
Homeowners often assume the detector should be as close as possible to the source.
However, detectors mounted too near appliances can experience nuisance alarms and inaccurate readings. Manufacturers typically recommend maintaining a minimum distance from combustion equipment.
For example, placing a detector directly above a gas furnace may trigger unnecessary alerts during normal operation.
Mounting Near Air Vents
- Airflow affects how gases move through a home.
- Supply vents, ceiling fans, return ducts, and open windows can interfere with accurate monitoring.
- Imagine a detector installed beside a strong HVAC supply vent. Air movement may dilute gas concentrations near the sensor, delaying detection.
- During a home inspection, vent-related placement problems are among the most frequently observed installation mistakes.
Placing Detectors Inside Kitchens
Kitchens contain multiple sources of temporary combustion.
Examples include:
- Gas stoves
- Ovens
- Cooking appliances
Although these devices are important sources of potential carbon monoxide, detectors mounted directly in kitchens often generate nuisance alarms.
Instead, detectors should generally be positioned nearby while maintaining recommended distances from cooking equipment.
Installing Only One Detector in the Entire House
Many homeowners purchase a single detector and assume coverage is complete.
This approach creates several weaknesses.
A carbon monoxide leak in a basement utility room may not be detected quickly by a detector located on an upper floor. Likewise, a leak near an attached garage may not trigger an alarm immediately if only one detector exists elsewhere in the house.
Large homes often require multiple devices to achieve proper coverage.
Ignoring Sleeping Areas
Bedrooms deserve special attention because exposure frequently occurs overnight.
A detector located on the opposite side of the home may not provide the earliest warning possible.
Consider a home with bedrooms upstairs and fuel-burning equipment in the basement. Installing detectors only near mechanical equipment leaves occupants vulnerable while sleeping.
This mistake remains one of the most serious carbon monoxide detector installation errors homeowners make.
Best Locations for Carbon Monoxide Detector Installation

Choosing the right locations dramatically improves protection.
Near Bedrooms
Detectors should be installed close enough to sleeping areas that alarms can be heard clearly during the night.
This recommendation is especially important for:
- Families with children
- Older adults
- Multi-bedroom homes
Many professionals consider bedroom-area placement the highest priority.
Outside Sleeping Areas
Hallways immediately outside bedrooms are often ideal locations.
These areas provide centralized monitoring while remaining close enough to wake occupants during emergencies.
A properly planned carbon monoxide detector installation usually includes at least one detector serving each sleeping zone.
On Every Level of the Home
Carbon monoxide can move throughout a structure.
As a result, each level should have dedicated protection.
This includes:
- Basements
- Main floors
- Upper floors
- Finished attics when applicable
Adding coverage at every level reduces detection delays.
Near Attached Garages
Vehicles remain a major source of carbon monoxide exposure.
Even brief engine operation inside a garage can allow exhaust gases to enter living spaces.
Detectors positioned near the interior door connecting the garage and home provide an additional layer of protection.
Basements with Fuel-Burning Equipment
Basements often contain:
- Furnaces
- Boilers
- Water heaters
- Backup generators
Although detectors should not be mounted directly beside these appliances, nearby coverage remains important.
The goal is early detection without creating nuisance alarms.
Recommended Placement Table
| Area of Home | Detector Recommended | Priority |
| Bedroom Hallway | Yes | Very High |
| Basement Utility Area | Yes | High |
| Main Living Area | Yes | High |
| Attached Garage Entry | Yes | High |
| Kitchen | Usually Nearby, Not Inside | Medium |
| Attic Storage Space | Usually Not Necessary | Low |
Step-by-Step Carbon Monoxide Detector Installation Guide

Once placement locations are selected, installation becomes straightforward.
Tools You May Need
Most installations require:
- Pencil
- Measuring tape
- Drill
- Screwdriver
- Wall anchors
- Ladder
Before beginning, review manufacturer instructions because mounting requirements vary.
Choosing the Right Mounting Location
Before drilling any holes, confirm that the chosen location follows both manufacturer guidance and local code requirements.
Use these general placement principles:
- Install detectors outside sleeping areas.
- Place at least one detector on every level.
- Avoid locations directly beside HVAC vents.
- Stay away from windows and exterior doors with strong airflow.
- Avoid humid locations unless approved by the manufacturer.
- Keep detectors away from cooking appliances.
Many modern detectors can be mounted on either walls or ceilings. Always verify the recommended mounting height in the product manual because requirements vary by model.
Proper planning during carbon monoxide detector installation prevents many of the performance issues that inspectors encounter later.
Installing Battery-Powered Units
Battery-powered models are popular because installation is relatively simple.
Basic installation steps include:
- Mark the mounting location.
- Drill pilot holes if necessary.
- Insert wall anchors.
- Attach the mounting bracket.
- Install fresh batteries.
- Secure the detector to the bracket.
- Perform an initial test.
Many homeowners complete this process in less than 20 minutes per detector.
However, the job should not end after mounting. Testing is essential to verify operation.
Installing Hardwired Models
Hardwired units require more planning and often involve electrical work.
General installation steps include:
- Turn off power at the breaker.
- Verify power is disconnected.
- Install electrical boxes if needed.
- Connect wiring according to manufacturer instructions.
- Attach the detector.
- Install backup batteries.
- Restore power.
- Test the entire system.
Because wiring mistakes can create safety risks, homeowners who lack electrical experience should consider hiring a licensed electrician.
The higher installation cost is often offset by improved reliability and reduced battery-related maintenance.
Testing After Installation
Testing verifies that the detector can alert occupants properly.
After installation:
- Press the test button.
- Confirm alarm volume.
- Verify interconnected alarms activate if applicable.
- Check smartphone notifications for smart models.
- Record the installation date.
Testing should also confirm that family members can hear alarms from bedrooms and other occupied spaces.
A successful carbon monoxide detector installation always includes verification rather than assuming everything works correctly.
Smart Carbon Monoxide Detectors vs Traditional Models

Homeowners now have more detector options than ever before. While traditional detectors remain effective, smart models offer additional capabilities.
Advantages of Smart Detectors
Smart detectors provide features that can improve awareness and convenience.
Common benefits include:
- Smartphone alerts
- Remote monitoring
- Self-testing functions
- Low-battery notifications
- Device status reports
- Integration with smart home systems
For example, a homeowner traveling for work may receive an immediate alert if elevated carbon monoxide levels are detected while the home is unoccupied.
Some systems can also notify multiple family members simultaneously.
These capabilities make smart devices appealing for larger households and vacation properties.
When Traditional Detectors Still Make Sense
Traditional detectors remain an excellent choice in many situations.
They are often:
- Less expensive
- Easier to install
- Simpler to maintain
- Reliable without internet connectivity
A small apartment with one sleeping area may not require advanced smart-home integration.
For many households, the most important factor is proper placement rather than advanced features.
Whether the detector is smart or traditional, correct carbon monoxide detector installation remains the primary safety consideration.
How Often Should Carbon Monoxide Detectors Be Replaced?

Installation is only the beginning. Ongoing maintenance ensures long-term protection.
Battery Replacement Schedule
Battery schedules vary by detector type.
General recommendations include:
- Replace standard batteries annually.
- Replace batteries immediately when low-battery warnings occur.
- Use manufacturer-approved battery types.
Some newer models contain sealed batteries designed to last the entire lifespan of the detector.
Even with sealed units, periodic testing remains necessary.
Detector Lifespan
Many homeowners do not realize detectors expire.
Most carbon monoxide detectors have a lifespan of:
- 5 to 10 years depending on the model
The sensing elements gradually lose accuracy over time.
As a result, detectors should be replaced according to manufacturer recommendations even if they appear to function normally.
Carbon Monoxide Detector Maintenance Checklist
Monthly:
- Test alarm operation.
- Inspect for damage.
- Check indicator lights.
Every 6 Months:
- Remove dust buildup.
- Verify mounting stability.
Annually:
- Replace batteries if required.
- Review detector locations.
Every 5–10 Years:
- Replace detectors according to manufacturer guidance.
A Detector Placement Mistake That Reduced Protection

A homeowner purchased three carbon monoxide detectors after replacing an aging furnace.
Initial placement included:
- One detector directly above the furnace.
- One detector in the kitchen.
- One detector in the living room.
At first glance, the setup seemed comprehensive.
However, a home safety inspection revealed several problems.
The furnace-mounted detector frequently experienced nuisance alarms because of its proximity to combustion equipment. The kitchen detector occasionally triggered during heavy cooking activity. Most importantly, no detector was located near the upstairs bedrooms.
The recommended corrections included:
- Relocating the furnace detector to a nearby hallway.
- Moving the kitchen detector outside the cooking area.
- Installing a detector outside the bedroom hallway.
After the adjustments:
- False alarms stopped.
- Sleeping areas received dedicated protection.
- Overall coverage improved significantly.
This example demonstrates how placement decisions often matter more than the total number of detectors installed.
Recommended Carbon Monoxide Detector Setup for Most Homes

Every home layout is different, but several practical configurations work well for most properties.
Small Apartments
Recommended setup:
- One detector outside the sleeping area.
- One combination smoke and carbon monoxide detector if permitted.
For compact floor plans, strategic placement often provides adequate coverage.
Single-Story Homes
Recommended setup:
- One detector near bedrooms.
- One detector near fuel-burning appliances.
- One detector in the primary living area if necessary.
This configuration provides multiple layers of protection without excessive cost.
Two-Story Homes
Recommended setup:
- One detector on each floor.
- One detector outside sleeping areas.
- Additional coverage near attached garages and utility rooms.
A well-planned carbon monoxide detector installation for a two-story home usually requires at least three or four detectors.
Homes with Attached Garages
Garages deserve additional attention because vehicle exhaust remains a common source of carbon monoxide.
Recommended locations include:
- Near the interior garage entry.
- Near bedroom areas.
- On every occupied floor.
This setup helps detect problems before gases spread throughout the home.
FAQ
1. Where should carbon monoxide detectors be installed?
Detectors should generally be installed outside sleeping areas, on every level of the home, and near attached garages or fuel-burning equipment while following manufacturer instructions.
2. Should detectors be installed in every bedroom?
Most guidelines recommend installation outside bedrooms rather than inside them. However, additional bedroom units may provide extra protection.
3. How far should detectors be from a furnace?
Specific distances vary by manufacturer. Always follow product instructions, but detectors should generally not be mounted directly beside combustion appliances.
4. Can I install a detector in the kitchen?
It is usually better to install the detector near the kitchen rather than inside it. Cooking activity can cause nuisance alarms.
5. Do smart detectors work better?
Smart detectors offer additional features such as smartphone alerts and remote monitoring. However, placement remains more important than connectivity.
6. How often should detectors be replaced?
Most manufacturers recommend replacement every 5 to 10 years depending on the model.
7. What causes false alarms?
Common causes include poor placement near furnaces, kitchens, fireplaces, strong airflow sources, and aging detectors.
8. How many detectors does my house need?
The answer depends on home size and layout. Most homes should have at least one detector on every level and near sleeping areas.
Conclusion
Carbon monoxide protection depends on more than simply purchasing a detector. Placement, coverage, maintenance, and testing all play essential roles in creating an effective safety system.
The most common homeowner mistakes include installing detectors too close to fuel-burning appliances, placing them near HVAC vents, relying on a single detector for the entire house, and failing to protect sleeping areas. Fortunately, these problems are easy to correct once identified.
A properly planned carbon monoxide detector installation provides earlier warnings, better coverage, and greater peace of mind. Review your current detector locations today, verify they follow manufacturer recommendations, and make any necessary adjustments before the next heating season arrives. A few minutes of inspection can make a significant difference in household safety.


Leave a Reply