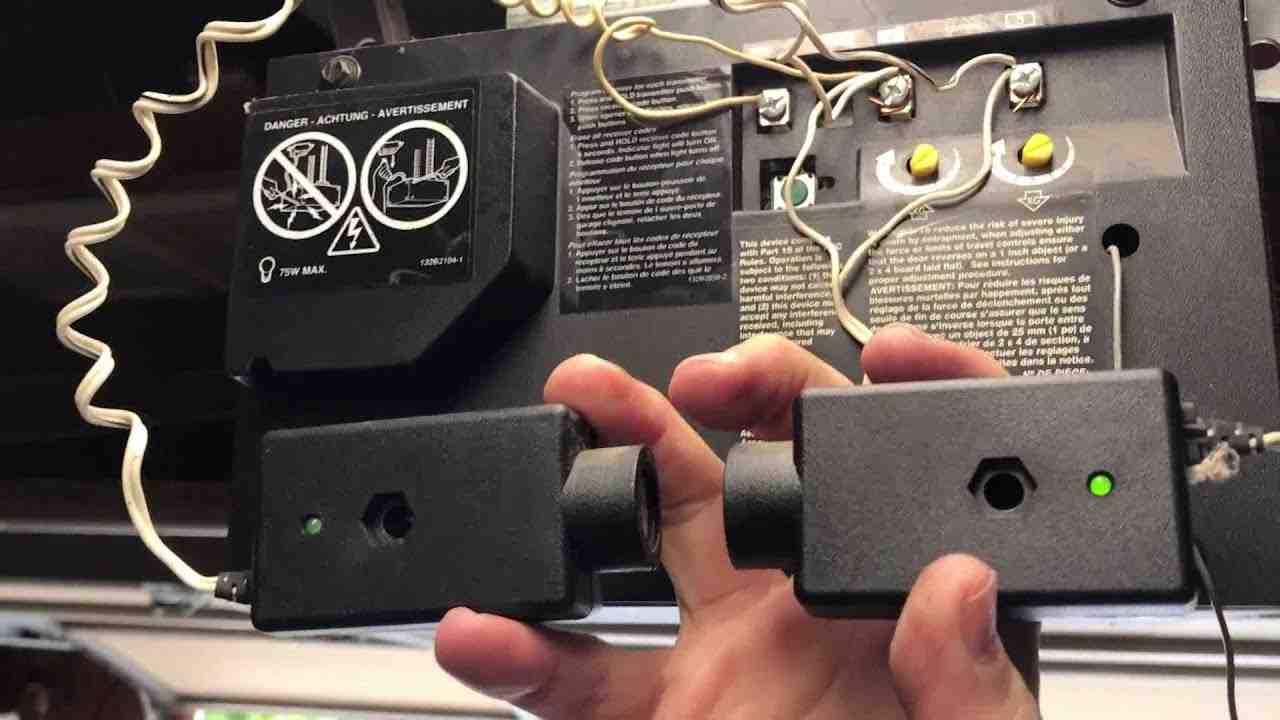
A garage door that suddenly refuses to close can throw off your entire day. Imagine leaving for work on a rainy morning, pressing the wall button, and watching the door move down a few inches before reversing. In many cases, the culprit isn’t a broken opener or a damaged spring. Instead, a small pair of safety devices near the floor is preventing the system from operating. Modern garage doors rely on garage door sensors to detect obstacles and prevent accidents.
When these sensors become misaligned, dirty, damaged, or disconnected, they can stop the door from closing properly. The good news is that many sensor problems can be diagnosed and fixed without replacing the entire opener system.
This guide explains how these safety devices work, how to identify common problems, and what steps homeowners can take before calling a professional.
How Garage Door Sensors Work

Most residential garage door openers manufactured after 1993 include a mandatory safety reversing system.
The setup typically consists of two photo-eye sensors installed near the bottom of the garage door tracks. One sensor sends an invisible infrared beam, while the other receives it.
When the beam remains uninterrupted:
- The garage door can close normally.
- The opener receives a signal that the doorway is clear.
- The safety system remains active.
When something blocks the beam:
- The door stops closing.
- The opener reverses direction.
- Potential injuries and property damage are prevented.
This simple technology has prevented countless accidents involving children, pets, bicycles, tools, and vehicles.
Components of Garage Door Sensors
A standard sensor system includes:
- Sending sensor
- Receiving sensor
- Mounting brackets
- Low-voltage wiring
- Indicator LEDs
- Garage door opener connection
Most sensors are mounted 4–6 inches above the garage floor to maximize safety.
Why Sensor Problems Are Common
Unlike springs and motors, sensors sit close to the ground where they face:
- Dust accumulation
- Water exposure
- Vehicle bumps
- Lawn equipment impacts
- Temperature changes
- Sunlight interference
Because of their location, sensor issues account for a large percentage of garage door service calls.
Common Garage Door Sensors Alignment Problems

Alignment problems are among the most frequent causes of garage door malfunctions.
The infrared beam between the sensors must remain perfectly aligned. Even a slight shift can interrupt communication.
Common causes include:
- Vibrations from daily door operation
- Accidental impacts
- Loose mounting hardware
- Bent track brackets
- Structural movement in older garages
How Misalignment Happens
Consider a homeowner who stores bicycles near the garage wall. While moving a bike, the tire lightly bumps the sensor bracket.
The impact may seem insignificant. However, a movement of only a few millimeters can be enough to break the beam connection.
As a result:
- The door begins closing.
- The opener detects a sensor fault.
- The door reverses immediately.
Seasonal Alignment Issues
Temperature fluctuations can also contribute to alignment problems.
During winter and summer months:
- Metal tracks expand and contract.
- Mounting brackets shift slightly.
- Fasteners loosen over time.
This explains why some sensor issues seem to appear without any obvious cause.
Signs Your Garage Door Sensors Are Misaligned

The symptoms of sensor misalignment are usually easy to spot.
However, homeowners often mistake them for opener or spring problems.
Watch for these warning signs:
- Door starts closing then reverses
- Door refuses to close with remote control
- Wall button works only when held down
- Flashing opener lights
- Blinking sensor LEDs
- Inconsistent operation
Flashing Sensor Lights
Most manufacturers use LED indicators to communicate sensor status.
Typical patterns include:
| Light Status | Meaning |
| Solid green | Proper alignment |
| Solid amber | Power present |
| Blinking light | Alignment issue |
| No light | Power or wiring problem |
Check your owner’s manual because colors vary between brands.
Intermittent Operation
Sometimes the door works perfectly for several days before acting up again.
This often points to:
- Loose brackets
- Vibration-related movement
- Weak wiring connections
- Sunlight interference
Intermittent faults can be more difficult to diagnose because they don’t occur consistently.
How to Check Sensor Indicator Lights

Before adjusting anything, inspect the LED indicators.
This simple test can save significant troubleshooting time.
Step 1: Locate Both Sensors
Look near the bottom of each garage door track.
Each sensor should face directly toward the opposite side.
Step 2: Inspect LED Status
Observe:
- Color
- Brightness
- Blinking patterns
If one sensor has no light, power may not be reaching it.
Step 3: Check for Obstructions
Look for:
- Leaves
- Cobwebs
- Storage boxes
- Sports equipment
- Pet toys
Even small objects can block the beam.
Step 4: Clean the Lenses
Use:
- Soft microfiber cloth
- Glass cleaner sprayed onto cloth
- Gentle circular motion
Avoid abrasive materials that can scratch the lens surface.
Step-by-Step Guide to Realigning Garage Door Sensors

If the lights indicate an alignment problem, follow this process.
Tools You’ll Need
- Screwdriver
- Level
- Measuring tape
- Soft cloth
Step 1: Disconnect Power
Safety comes first.
Unplug the opener or switch off the breaker before making adjustments.
Step 2: Loosen Mounting Brackets
Loosen bracket screws slightly.
Do not remove them completely.
Step 3: Align Both Sensors
Point each sensor directly at the other.
Many technicians use a small level to ensure consistent positioning.
Step 4: Watch the Indicator Lights
As alignment improves:
- Blinking lights usually become solid.
- Signal strength stabilizes.
- Communication is restored.
Step 5: Tighten Hardware
Secure all fasteners carefully.
Avoid overtightening, which can move the sensor again.
Step 6: Test Door Operation
Restore power.
Run multiple open-and-close cycles to confirm consistent operation.
Alignment Checklist
Before finishing, verify:
- Both sensors face each other
- Lights remain solid
- Brackets are secure
- No objects block the beam
- Door completes full cycles
Garage Door Sensors Wiring Issues and Repairs

After alignment problems, wiring faults are the second most common cause of sensor failure.
The low-voltage wires connecting the sensors to the opener are vulnerable to damage.
Common wiring problems include:
- Rodent damage
- Loose terminals
- Corrosion
- Crushed cables
- Staple punctures
Identifying Wiring Problems
Symptoms often include:
- One sensor completely dark
- Random operation failures
- Flashing opener diagnostics
- Sensors losing power intermittently
Visual Inspection Process
Follow the wire path from the sensor to the opener.
Look for:
- Exposed copper
- Frayed insulation
- Pinched sections
- Loose connections
Many homeowners discover damage near wall staples or garage corners.
Typical Wiring Repair Costs
| Repair Type | Typical Cost |
| Wire splice | $50–$120 |
| New sensor wire | $75–$200 |
| Sensor replacement | $80–$250 |
| Full diagnostic visit | $80–$150 |
Costs vary by region and door system.
Dirt, Moisture, and Weather-Related Problems

Many sensor problems have surprisingly simple causes.
Because garage door sensors are mounted close to the floor, they are constantly exposed to dirt, moisture, road salt, and debris.
Dirt and Dust Buildup
Over time, dust can accumulate on sensor lenses.
Common sources include:
- Sawdust from DIY projects
- Vehicle exhaust residue
- General household dust
- Construction debris
Even a thin layer of grime can weaken the infrared beam.
Moisture Problems
Water can create several issues:
- Corroded wiring terminals
- Lens fogging
- Electrical shorts
- Sensor housing damage
Garages located in humid climates often experience more moisture-related failures.
Winter Weather Challenges
Cold climates introduce additional complications:
- Condensation formation
- Ice accumulation
- Salt residue
- Frozen mounting brackets
Homeowners frequently notice sensor issues during seasonal transitions when temperature swings are most dramatic.
Quick Cleaning Checklist
Perform these maintenance tasks every few months:
- Wipe sensor lenses
- Remove spider webs
- Check mounting hardware
- Inspect wires
- Verify LED status
- Test reversal function
A five-minute inspection can prevent many common failures.
Sunlight Interference and Garage Door Sensors Performance

Direct sunlight is one of the most overlooked causes of sensor problems.
Certain garage orientations create conditions where sunlight shines directly into the receiving sensor during specific hours of the day.
Why Sunlight Causes Problems
The receiving sensor is designed to detect a precise infrared signal.
When intense sunlight enters the lens:
- The receiver can become overwhelmed.
- Signal recognition decreases.
- The system may interpret the beam as interrupted.
As a result, the door reverses unexpectedly.
Common Symptoms
Sunlight interference often follows a predictable pattern:
- Door works in the morning.
- Problems appear during late afternoon.
- Operation returns to normal after sunset.
This schedule-based failure is a major clue.
Solutions for Sunlight Interference
Try the following:
- Install sensor sun shields.
- Adjust sensor positioning slightly.
- Add protective covers approved by the manufacturer.
- Clean lenses thoroughly.
- Improve alignment accuracy.
In many cases, a simple shield costing less than $20 solves the issue.
When Garage Door Sensors Need Replacement

Although many sensor issues are repairable, replacement eventually becomes necessary.
Most sensor systems last between 5 and 15 years depending on:
- Usage frequency
- Climate conditions
- Maintenance habits
- Installation quality
Signs Replacement Is Necessary
Consider replacement when:
- Sensor housings are cracked
- Water damage is severe
- Internal electronics fail
- Alignment no longer restores operation
- LEDs remain off despite proper wiring
Replacement vs. Repair
Use this guideline:
| Condition | Recommended Action |
| Dirty lens | Clean |
| Minor alignment issue | Adjust |
| Loose wiring | Repair |
| Corroded terminals | Repair or replace |
| Cracked housing | Replace |
| Internal circuit failure | Replace |
Expected Replacement Costs
Typical homeowner expenses include:
| Service | Estimated Cost |
| DIY sensor kit | $25–$80 |
| Professional sensor replacement | $100–$250 |
| Premium brand replacement | $150–$350 |
Most replacements can be completed in less than one hour.
Safety Risks When Garage Door Sensors Fail

The primary purpose of these devices is home security.
Ignoring sensor problems can create serious hazards.
Risk to Children and Pets
Children often move unpredictably around garage doors.
Without a functioning safety system:
- Entrapment risks increase.
- Serious injuries become possible.
- Liability concerns arise.
Vehicle Damage
Faulty sensors may contribute to:
- Door contact with vehicles
- Scratches and dents
- Bent panels
- Track damage
A repair that could have cost $50 may eventually become a repair costing hundreds of dollars.
Property Damage
Sensor failures can also affect:
- Bicycles
- Lawn equipment
- Storage containers
- Tools
- Household items
Monthly Safety Test
Every homeowner should perform a reversal test monthly.
Procedure:
- Place a cardboard box in the door’s path.
- Close the door.
- Confirm immediate reversal when contact occurs.
- Verify sensor beam interruption also reverses the door.
If either test fails, troubleshooting should begin immediately.
When to Call a Professional Technician

Many homeowners can successfully address basic maintenance issues.
However, some situations require expert assistance.
Call a Professional If:
- Wiring damage is extensive
- Opener diagnostics indicate internal faults
- Sensor replacement fails to solve the problem
- Track damage is present
- Electrical issues are suspected
- The door behaves unpredictably
Typical Service Call Costs
In many markets, garage door service calls range between:
- $80–$150 for diagnostics
- $100–$250 for sensor replacement
- $150–$400 for advanced electrical repairs
The exact amount depends on location and equipment type.
Benefits of Professional Diagnosis
Experienced technicians can:
- Identify hidden wiring faults
- Test signal strength
- Verify opener health
- Detect track issues
- Ensure compliance with safety standards
A professional inspection often prevents unnecessary parts replacement.
Preventive Maintenance Checklist for Garage Door Sensors

Regular maintenance is significantly cheaper than emergency repairs.
Monthly Tasks
- Check indicator lights
- Clean lenses
- Remove debris
- Test reversal system
Quarterly Tasks
- Inspect brackets
- Tighten hardware
- Check wire condition
- Verify alignment
Annual Tasks
- Complete system inspection
- Lubricate moving components
- Evaluate opener performance
- Replace damaged wiring
Following this schedule can add years to sensor life.
Frequently Asked Questions
Why won’t my garage door close unless I hold the wall button?
This often indicates a sensor alignment problem or interrupted safety beam. The opener enters a manual override mode when the wall button is held continuously.
How long do sensors typically last?
Most systems last between 5 and 15 years depending on environmental conditions, maintenance, and usage frequency.
Can dirty sensors stop a garage door from closing?
Yes. Dirt, dust, spider webs, and debris can weaken or block the infrared beam.
Are blinking sensor lights always caused by alignment issues?
Not always. Wiring faults, power problems, damaged sensors, and sunlight interference can also cause blinking indicators.
Can I replace sensors myself?
Many homeowners can perform a basic replacement if they follow manufacturer instructions carefully. However, professional installation may be advisable for complex systems.
How much does sensor replacement usually cost?
DIY replacements typically range from $25–$80 for parts, while professional replacement generally costs $100–$250.
Can sunlight affect sensor operation?
Yes. Direct sunlight can overwhelm the receiving sensor and temporarily interrupt beam detection.
What should I do if cleaning and alignment don’t work?
Inspect wiring, verify power supply, check terminal connections, and consider professional diagnostics if the problem persists.
Conclusion
Troubleshooting garage door sensors does not always require advanced tools or expensive repairs. Many problems stem from simple issues such as dirty lenses, loose brackets, minor alignment errors, or damaged wiring. By following a systematic approach, homeowners can often identify the root cause within minutes and restore normal operation without replacing major components.
Regular inspections, monthly safety testing, and routine cleaning help prevent unexpected failures. Since these devices are a critical part of the garage door safety system, they should never be ignored when problems appear. If basic troubleshooting fails to resolve the issue, professional diagnosis is usually the safest next step.
Most importantly, remember that garage door sensors are designed to protect people, pets, vehicles, and property. Taking the time to maintain them properly can improve reliability, reduce repair costs, and keep your garage door operating safely for years to come.


Leave a Reply